설치하려다보니 2015년도에 작성된 것을 참고했다.
순전히 설치에만 필요한 내용만 남기기로 했다.
오래된 우분투 14 서버 버전에 설치했다.
버전이 낮다보니 웹에서 찾아서 이것 저것 해보다가 그나마 문제 없이 잘 설치된 이 문서를 옮기기로 했다.
이 문서에 따르면, 일단 제목처럼 OpenCV 3.0 , Python 3.4+ 설치에 집중하고 CMake는 따로 올렸단다. 관심 있으시면 찾아 보시길..
OpenCV 3.0 와 Python 3.4+ 를 Ubuntu 에 어떻게 설치할까
UPDATE: 문서 만든지가 2-3년전인 것 같은데 아직도 Ubuntu 14.04.에서 완벽하게 작동한다. 하지만 Ubuntu 16.04 에서 OpenCV 3.1 과 Python 3.5+ 를 설치하고자 한다면 아래 링크를 확인하세요.
https://www.pyimagesearch.com/2016/10/24/ubuntu-16-04-how-to-install-opencv/
OpenCV 3.0 and Python 2.7+ on Ubuntu, 문서는 여진히 파이썬 2.7 사용자에게는 유용하다..
2015년에 작성된 문서라서
Step 1: 필수 구성요소 설치
기존 패키지 업그레이드:
| $ sudo apt-get update $ sudo apt-get upgrade |
OpenCV 3.0 컴파일을 위한 개발자툴 설치:
| $ sudo apt-get install build-essential cmake git pkg-config |
디스크에서 다양한 이미지 포멧을 읽기 위한 라이브러리 설치:
| $ sudo apt-get install libjpeg8-dev libtiff4-dev libjasper-dev libpng12-dev |
디스크에서 다양한 비디오 포멧을 읽기 위한 라이브러리 설치:
| $ sudo apt-get install libavcodec-dev libavformat-dev libswscale-dev libv4l-dev |
OpenCV’s GUI 특성을 사용할 수 있는 GTK 설치:
| $ sudo apt-get install libgtk2.0-dev |
매트릭스 처리와 같은 OpenCV에서 사용하는 함수 최적화 패키지 설치:
| $ sudo apt-get install libatlas-base-dev gfortran |
Step 2: Python 설정 (Part 1)
파이썬3 용 설치 매니저 pip 를 받자:
| $ wget https://bootstrap.pypa.io/get-pip.py $ sudo python3 get-pip.py |
기억하세요, pip 설치시에 python3 를 명시해야 한다네요.. 안그러면 파이썬 2.7로 설치된데요.
파이썬 개발을 위해서는 가상환경을 사용해야합니다.
virtualenv 와 virtualenvwrapper 을 이용해서 완전히 독립된 파이썬 개발 환경을 가질 수 있습니다. 프로젝트마다 완전히 별도의 환경을 얻을 수도 있습니다.
pip3 을 사용해서, virtualenv 와virtualenvwrapper 를 설치합니다:
| $ sudo pip3 install virtualenv virtualenvwrapper |
다시 말하지만, pip3 를 사용해야합니다. pip 가 아니에요. —Python 3.4.를 이용해서 설치 할테니까요.
이제 우리는 ~/.bashrc 파일을 업데이트합니다. (파일아래붙여요):
| # virtualenv and virtualenvwrapper export VIRTUALENVWRAPPER_PYTHON=/usr/bin/python3 export WORKON_HOME=$HOME/.virtualenvs source /usr/local/bin/virtualenvwrapper.sh |
파이썬3 실행파일이 우분투 시스템의 어디에 있는지 VIRTUALENVWRAPPER_PYTHON 에 지정합니다.
터미널에 새로 들어 온 것 처럼 ~/.bashrc 를 다시 불러옵니다:
마지막으로, cv 가상환경을 만들어서 OpenCV 3.0 and Python 3.4 개발 비전을 제공합니다:
Step 2: Python 설정 (Part 2)
Python 설정의 반은 왔네요.. 하지만, 파이썬 3.4+ 바인딩으로 OpenCV 3.0 을 컴파일 위한 Python 3.4+ headers 와 development 파일 설치:
| $ sudo apt-get install python3.4-dev |
OpenCV 는 NumPy arrays로 이미지를 표현하는데, 그러기 위해서는 NumPy 을 cv 가상환경에 에 설치해야 합니다:
만약에 아래와 같이 pip의 .cache directory에 대한 권한 문제가 발생하면:
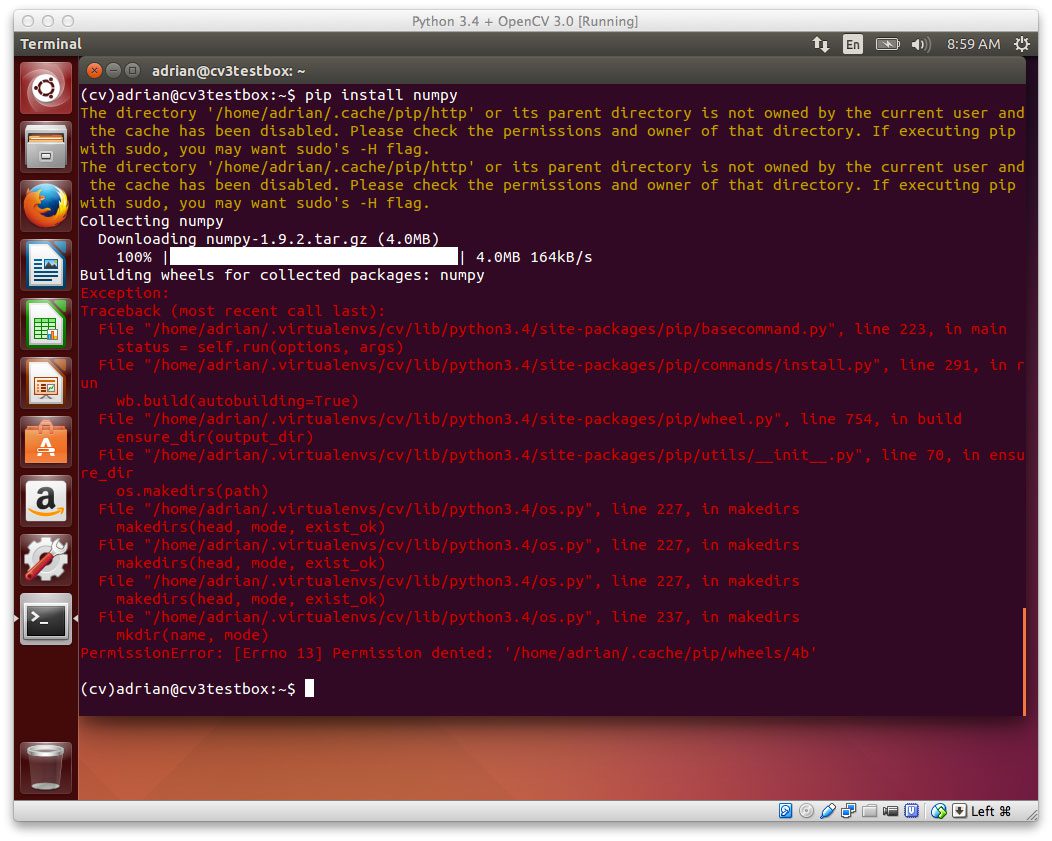
Figure 1: If you get a “Permission Denied” error, no worries — that’s an easy fix!
그냥 간단히 cache directory 를 지우고 NumPy 를 다시 설치하세요:
| $ sudo rm -rf ~/.cache/pip/ $ pip install numpy |
그러면, NumPy를 잘 설치 할 수 있습니다:
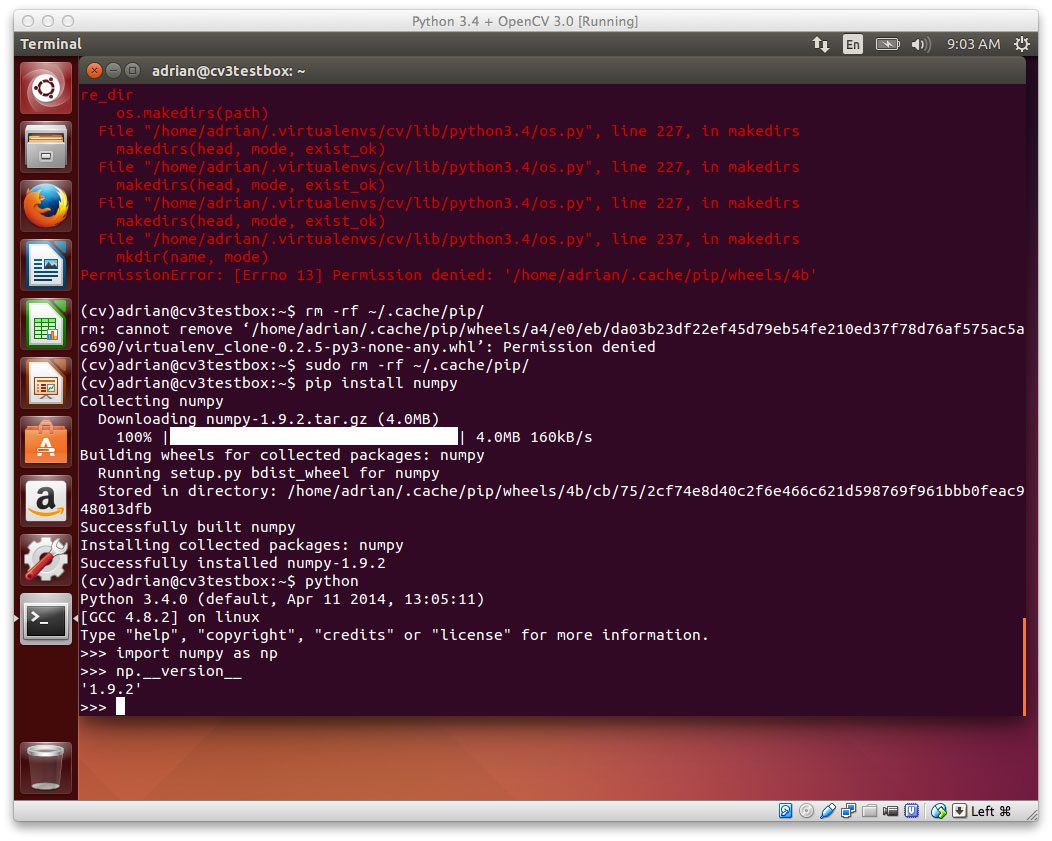
Figure 2: Deleting the .cache/pip directory and re-running pip install numpy will take care of the problem.
Step 3: Python 3.4+ bindings 으로 OpenCV 3.0 을 만들고 설치한다
지금 드디어 설정이 다 끝났습니다 !! Let’s GifHub에서 OpenCV 를 pull 해서 3.0.0 version을 checkout 합시다:
| $ cd ~ $ git clone https://github.com/Itseez/opencv.git $ cd opencv $ git checkout 3.0.0 |
Update (3 January 2016): 3.0.0 version 을 어떤 버젼으로든 바꿀 수 있습니다. (지금은, 3.1.0 ). OpenCV.org 에서 최신정보를 확인하세요.
opencv_contrib repo 도 가져옵니다. ( opencv_contrib 가 왜 필요한지 알려면, previous OpenCV 3.0 Ubuntu install post):
| $ cd ~ $ git clone https://github.com/Itseez/opencv_contrib.git $ cd opencv_contrib $ git checkout 3.0.0 |
같은 버젼의 opencv_contrib 를 가져옵니다. 그렇게 하지 않으면 오류가 납니다..
빌드할 시간입니다:
| $ cd ~/opencv $ mkdir build $ cd build $ cmake -D CMAKE_BUILD_TYPE=RELEASE \ -D CMAKE_INSTALL_PREFIX=/usr/local \ -D INSTALL_C_EXAMPLES=ON \ -D INSTALL_PYTHON_EXAMPLES=ON \ -D OPENCV_EXTRA_MODULES_PATH=~/opencv_contrib/modules \ -D BUILD_EXAMPLES=ON .. |
Update (3 January 2016): OpenCV 3.1.0 설치를 위해서는, -DINSTALL_C_EXAMPLES=OFF 옵션이 필요합니다. (rather than ON ). OpenCV v3.1.0 CMake build script 에 오류가 있습니다. 그것은 스위치온으로 남겨두면 오류가 납니다. 스위치오프로 한 번 해놓으면, CMake 는 문제없이 동작합니다.
CMake output을 몇 초간 보세요:
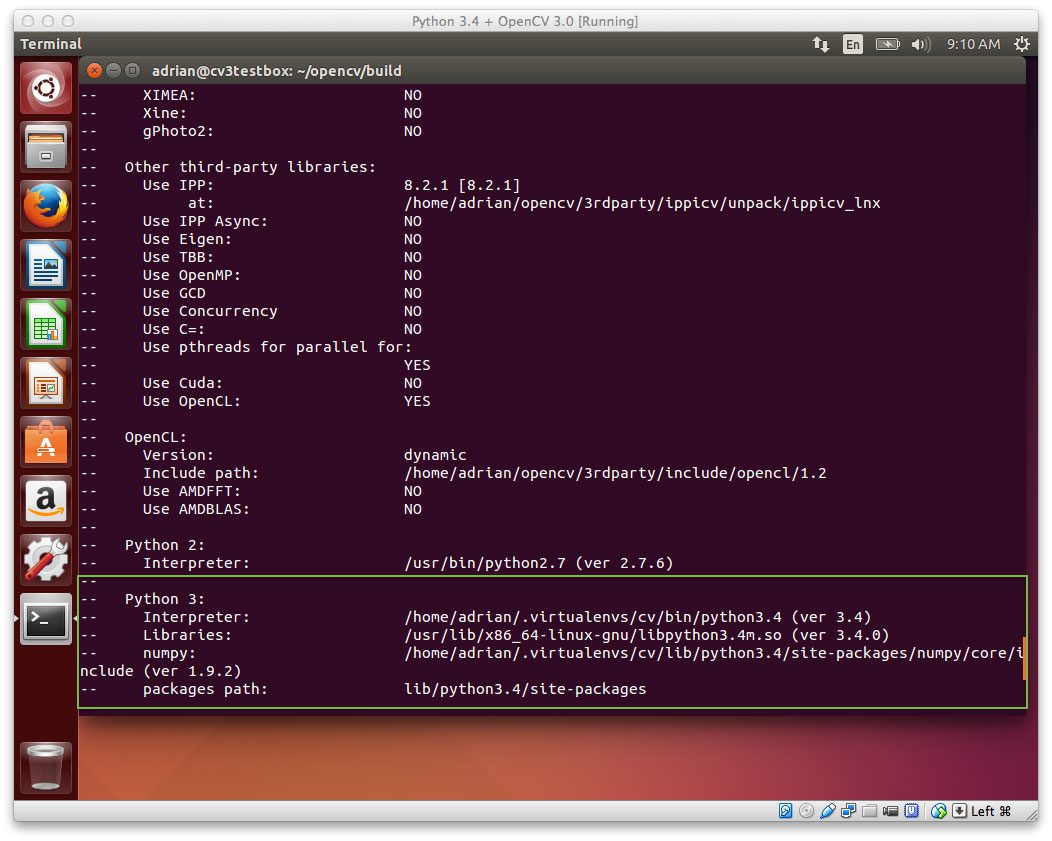
Figure 3: It’s a good idea to inspect the output of CMake to ensure the proper Python 3 interpreter, libraries, etc. have been picked up.
Notice how CMake has been able to pick up our Python 3 interpreter! This indicates that OpenCV 3.0 will be compiled with our Python 3.4+ bindings.
Speaking of compiling, let’s go ahead and kickoff the OpenCV compile process:
컴파일 시간을 빠르게 하기 위해서, 컴퓨터에 따라서 번호 4를 바꿀 수도 있습니다.
OpenCV 3.0 컴파일에 문제가 없다면, 설치를 하세요:
| $ sudo make install $ sudo ldconfig |
Step 4: Sym-link OpenCV 3.0
여기까지 설치가 되었다면, OpenCV 3.0 은 해당 경로에 있답니다. /usr/local/lib/python3.4/site-packages/
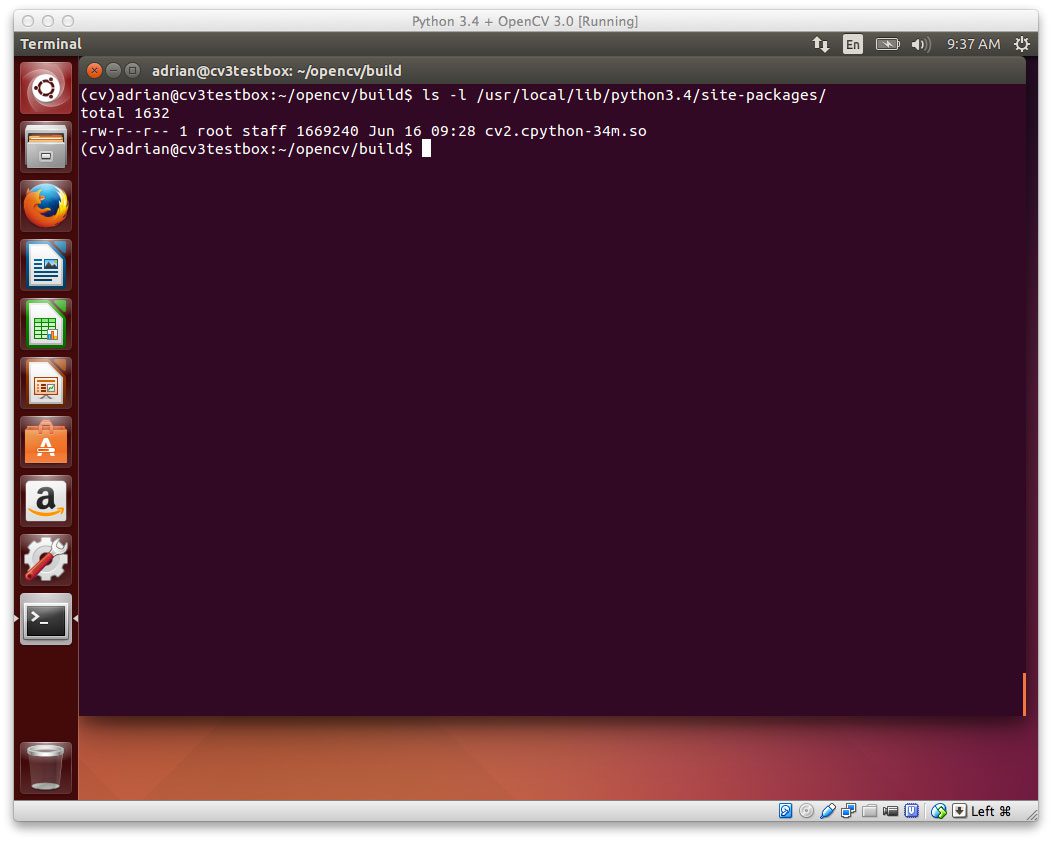
Figure 4: The Python 3.4+ OpenCV 3.0 bindings are now installed in /usr/local/lib/python3.4/site-packages/
여기, OpenCV bindings 은 이 이름으로 존재합니다. cv2.cpython-34m.so
몇 초동안 실제 저 이름으로 존재하는지 확인하세요!
어째꺼나, cv 가상 환경에서OpenCV 3.0 을 사용하기 위해서 , 먼저 cv 환경에서 sym-link OpenCV 를 site-packages 경로에 연결시킵니다.:
| $ cd ~/.virtualenvs/cv/lib/python3.4/site-packages/ $ ln -s /usr/local/lib/python3.4/site-packages/cv2.cpython-34m.so cv2.so |
주목하세요, cv2.cpython-34m.so 를 cv2.so 이름으로 링크합니다— 이렇게 해야지, Python이 cv2 이름을 이용해서 OpenCV 바인딩을 import 할 수 있습니다..
그래서, 지금 cv 가상 환경에서 site-packages 경로를 조회하면, OpenCV 3.0 bindings (cv2.so file)을 볼 수 있습니다:
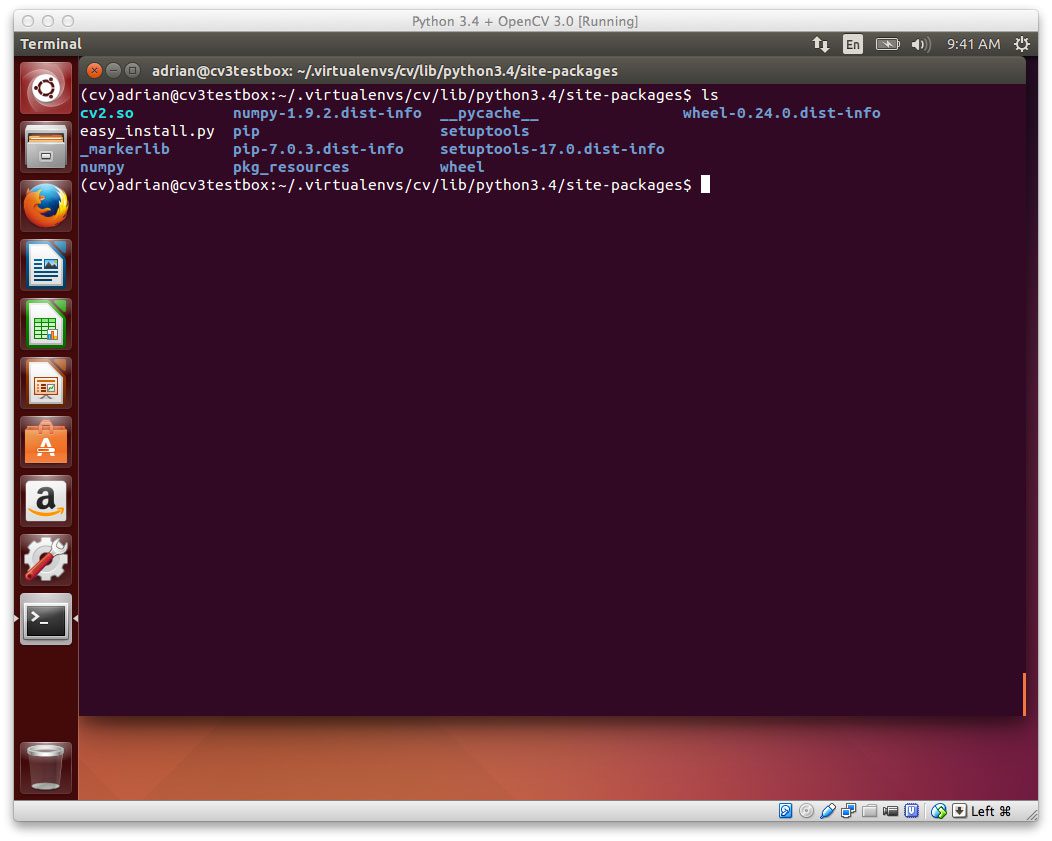
Figure 5: In order to access the OpenCV 3.0 bindings from our Python 3.4+ interpreter, we need to sym-link the cv2.so file into our site-packages directory.
다시 말하지만, 이것은 매우 중요한 단계입니다, cv2.so file 이 가상환경에 있는지 반드시 확인해야합니다. 그렇지 않으면, OpenCV in your Python scripts를 가져올(import) 수 없습니다 !
Step 5: OpenCV 3.0 테스트와 Python 3.4+ 설치
훌륭합니다! 당신은 성공적으로 Python 3.4+ bindings 과 OpenCV 3.0 (그리고 가상환경) 을 당신의 시스템에 설치했습니다!
하지만, 샴페인과 맥주를 마시기전에, 작동되는 설치를 했는지 확인합시다. 먼저, cv 가상환경에 있는지 확인하고, 다음에 Python 3 에서 cv2 import를 시도하세요:
| $ workon cv $ python >>> import cv2 >>> cv2.__version__ '3.0.0' |
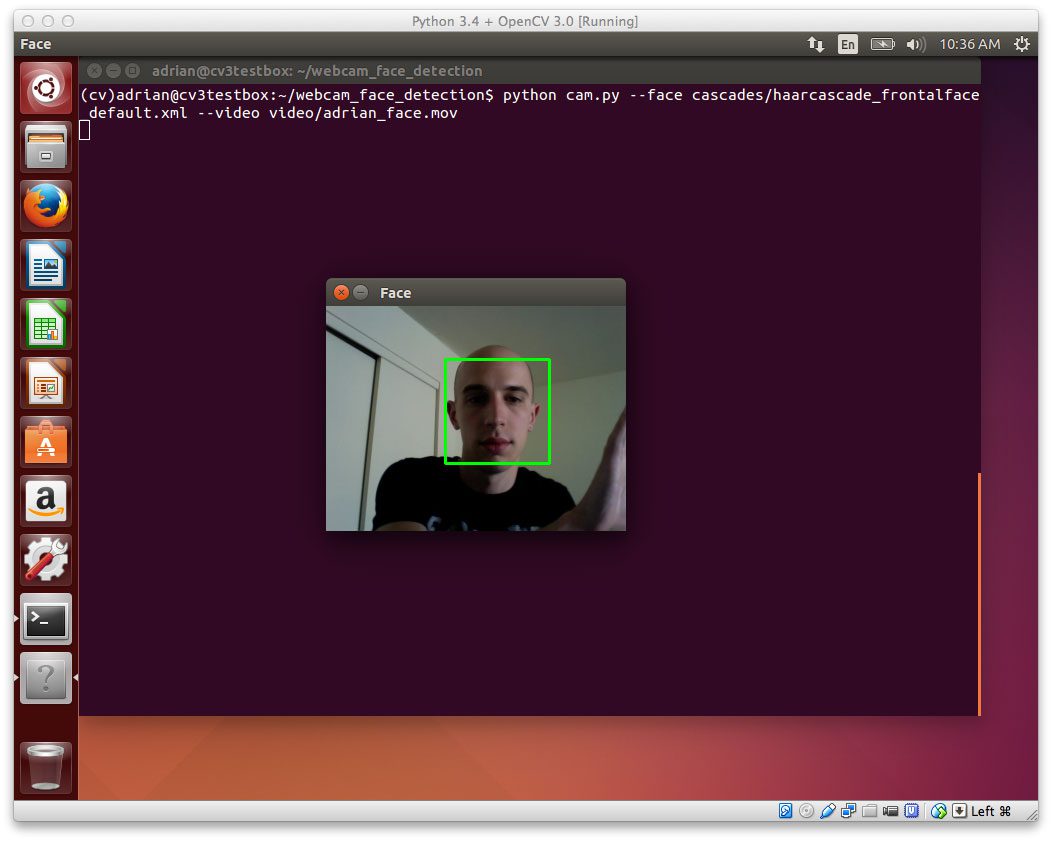
여기 예제가 있습니다:
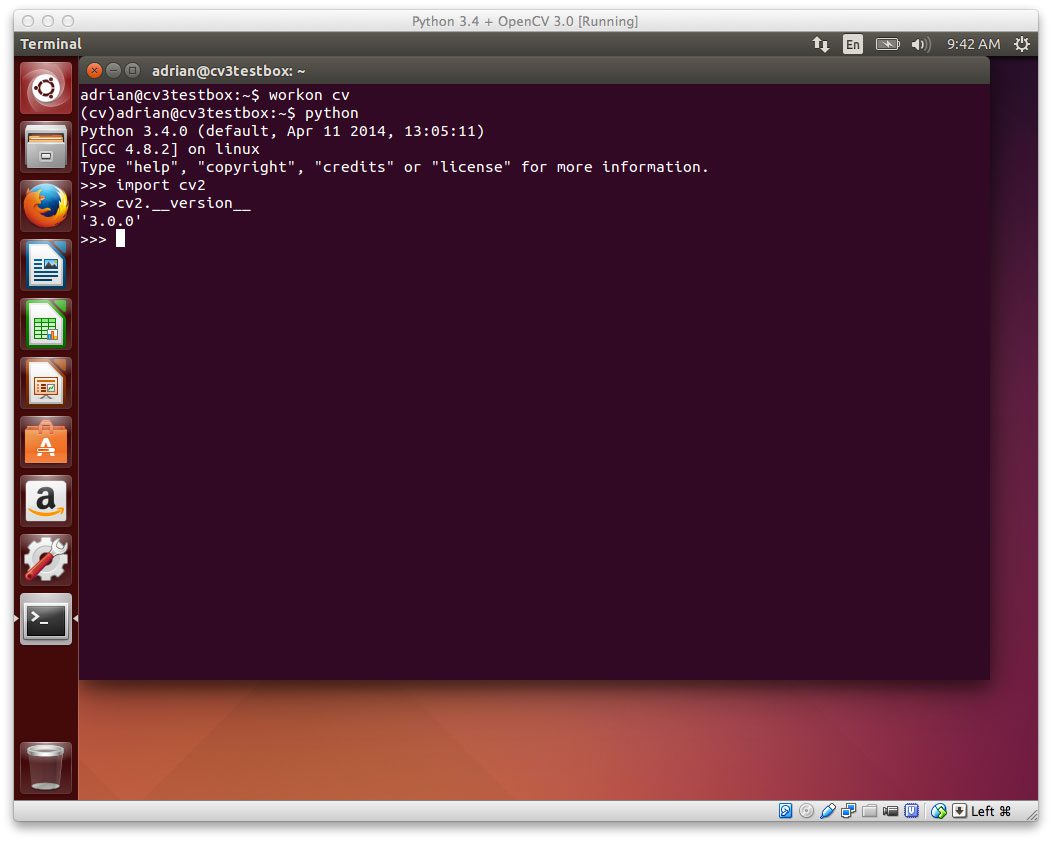
Figure 6: OpenCV 3.0 with Python 3.4+ bindings has been successfully installed on the Ubuntu system!
당신이 보는데로, OpenCV 3.0 with Python 3.4+ bindings 우분투 시스템에 성공적으로 설치가 되었습니다!
요약
In this tutorial I have demonstrated how to install OpenCV 3.0 with Python 3.4+ bindings on your Ubuntu system. This article is very similar to our previous tutorial on installing OpenCV 3.0 and Python 2.7 on Ubuntu, but takes advantage of OpenCV 3.0’s new Python 3+ support, ensuring that we can use the Python 3 interpreter in our work.
While having Python 3.4+ support is really awesome and is certainly the future of the Python programming language, I would also advise you to take special care when considering migrating from Python 2.7 to Python 3.4. For many scientific developers, the move from Python 2.7 to 3.4 has been a slow, arduous one. While the big Python packages such as NumPy, SciPy, and scikit-learn have made the switch, there are still other smaller libraries that are dependent on Python 2.7. That said, if you’re a scientific developer working in computer vision, machine learning, or data science, you’ll want to be careful when moving to Python 3.4 as you could easily pigeonhole your research.
Over the coming weeks the OpenCV 3.0 install-fest will continue, so if you would like to receive email updates when new install tutorials are released (such as installing OpenCV 3.0 with Homebrew, installing OpenCV 3.0 on the Raspberry Pi, and more), please enter your email address in the form below.


